Overseeing users, groups, and permissions is essential for upholding system security and guaranteeing that only authorized personnel can access designated resources. This article outlines the fundamentals of this management process and provides guidance on how to effectively implement it for your Linux distribution.
Note: Changing permissions requires super user privileges. Switch to root with “su –” or prefix these commands with “sudo“
User Accounts
- A user account is a unique identity for a user on the system
- Users can be created, deleted, and modified using the useradd and userdel commands
- Passwords are set with the passwd command
Example:
Create new user called user1
useradd user1
Set initial password for user1
passwd user1Delete user1
userdel user1Groups
- A group is a collection of users who share common access
- Users can be added to or removed from groups using the usermod and gpasswd commands
Example:
Add user1 to group1
usermod -aG group1 user1
Remove user1 from group1
gpasswd -d user1 group1Permissions
Listing file permissions
Permissions can be viewed using “ls” with this syntax
ls -[options] </directories/files>Common Options:
- l: list files in long format
- a: list all files and folder, including hidden items
Examples:
List all files and folders in long format
ls -laList details of file1.txt in long format
ls -l file1.txtTerminal output will be formatted like this:
Permissions   User  Group  Size Date   Time  Filename
-rw-rw-r--  1 user1 group1    0 Dec  3 17:37 file1.txt
This output is interpreted as:
- file1.txt is not a directory
- user1 can read and write to file1.txt
- group1 can read and write to file1.txt
- other users and groups can read file1.txt
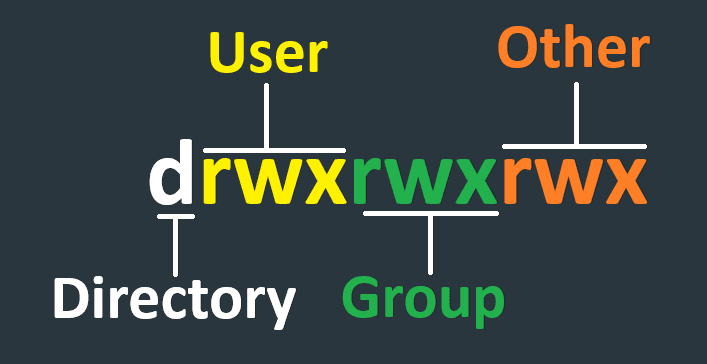
- User : Ownership (who has access)
- Group : Shared access with others in the same group
- Other : Access from outside the group
Changing Permissions
Permissions are set using the chmod command. Use chmod with the following syntax to change the permissions of a file or directory:
chmod -[options] <permissions> </directories/file>Common Options:
- R : Set permissions recursively
Permissions:
- (u)ser
- (g)roup
- (o)ther
- (a)ll users and groups.
- (+)Add
- (-)Remove
- (r)ead,
- (w)rite
- e(x)ecute
Examples:
Add execute permissions to file.txt for user
chmod u+x file.txtAdd read and remove write and execute permissions on file.txt for group and others
chmod go+r-wx file.txtRemove write permissions for all items in a directory for everyone
chmod -R a-w /path/to/directory/Changing File Ownership
The chown command is used to change the ownership of a file or directory. It allows you to specify both the new owner and group IDs using the following syntax:
chown -[options] <user>:<group> </directories/file>Options:
- R : Recursively apply changes to all files in a directory
- h : Change the owner of a symbolic link
- –reference : Change the owner of a file/directory to match a reference file
Examples:
Change ownership of file.txt to owner user1 and group1
chown user1:group1 file.txtChange the ownership of a symbolic link to owner user1 and group1
chown -h user1:group1 path/to/symlinkChange ownership of file1.txt to match file2.txt
chown --reference path/to/file2.txt path/to/file1.txtClosing Remarks
The key principle to keep in mind when setting permissions is the “Least Privilege” principle:
“Deny by Default, Grant as Necessary”
This means that unless explicitly allowed, a user or group should not have access to a resource or file. Instead, only grant necessary access on a need-to-know basis.
By doing so, you minimize the attack surface and reduce the risk of unauthorized access or malicious activity.
Nice and clean. Me likey!